HEALTHY QUINOA NASI GORENG

Every Tuesday night in our little share house family we alternate with who cooks the evening meal for all. There are basically two rules; 1. cook a ‘clean’ and healthy meal and 2. make it substantial enough for the manly men too! Continue reading “HEALTHY QUINOA NASI GORENG”

SALTED CACAO AND HAZELNUT COOKIES

A healthy cookie is honestly HARD to find. or at least one that is crunchy and actually cookie like. I have had some serious cookie fails (usually with protein powders) in the kitchen and so each batch always comes out of the oven with a little natural hesitation. But FINALLY here is a cookie that tastes amazing and won’t disappoint on the crunch or taste factor. Continue reading “SALTED CACAO AND HAZELNUT COOKIES”

NATURES SKITTLES

The other day I caught myself out by saying “oooo if you are feeling sick eat white foods… they are apparently good for your immune system” and then followed by listing off all of the white coloured foods I could think of… Onion, garlic, mushrooms, leeks, cauliflower… and then I stopped realising that I had only ‘heard’ this once and had NO IDEA why or if it was true.

So here is the dirt behind why certain food colours mean certain things to our body and why.

WHITE = IMMUNITY (beta-glucans); Immune system. Ok so I was right here. White foods activate our natural killer cells and reduce cancer risk whilst strengthening our immune systems

RED = HEART (lycopene); improves heart and blood health, supports joints and increases circulation.

ORANGE = VISION (beta-carotene); boosts eye and skin health and may decrease your risk of developing cancer

YELLOW = BEAUTY (carotenoids); stimulates digestion and promotes collagen growth for radiant youthful skin and strong bones

BLUE/PURPLE = AGING (anthocyanins); powerful healing antioxidants for retinal health and vision, assisting with healthy aging and improving memory

GREEN = DETOXING (chlorophyll); powerful detoxers, improves oxygenation and normalises digestion

So now when mum says “eat your greens” you can turn around and say “but what about my reds and whites too?”

K

CHOC PEANUT BUTTER SALTED CARAMEL SLICE

This would have to be my signature and most successful to date raw sugarfree dessert. Firstly if you know me well you will know that I am … how shall i put this… a HUGE fan of (some might say obsessed with) peanut butter. Not only does it taste amazing but it also has amazing health benefits. Peanut butter, and I am talking the natural no added sugar or vegetable oil ones, is chock-full of heart-healthy monounsaturated fat which reduces belly fat, decrease your risk of diabetes, heart disease and other chronic health conditions. The combination of fibre and protein fills you up and keeps you fuller for longer, so you eat less overall. One study published in the Journal of the Medical Association found that consuming about 2 tablespoons a day at least 5 days a week can lower the risk of developing diabetes and belly fat by almost 30%. Hell yes!!!

So get your spooning on!!!


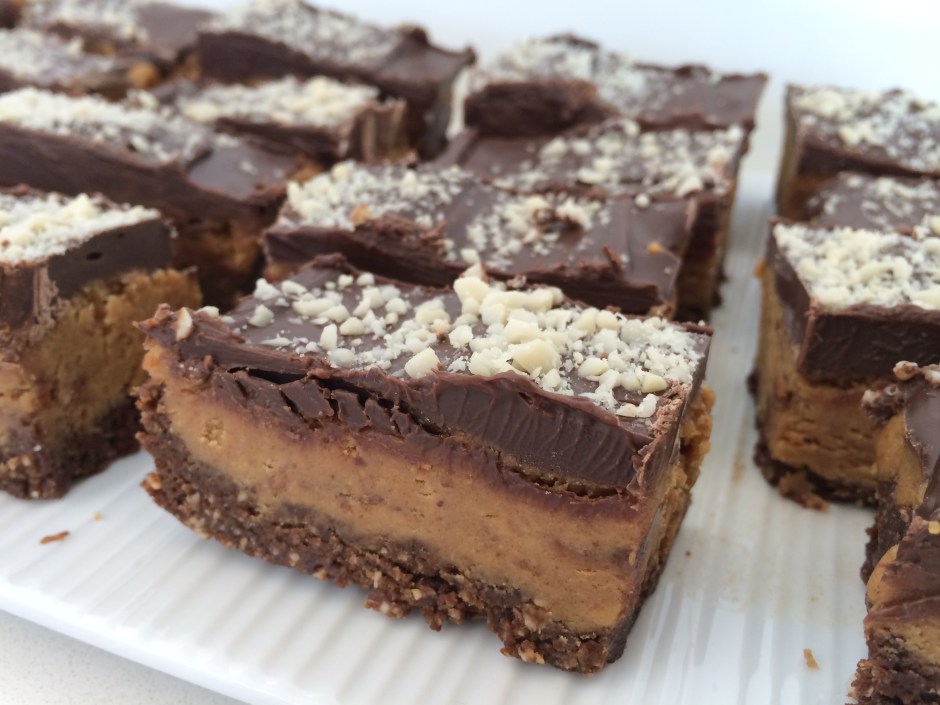
CHOC PEANUT BUTTER SALTED CARAMEL SLICE GF SF DF V* P*


CHOC BROWNIE BASE

1 1/4 C rolled oats

1 C pitted dates (soaked overnight in water)

½ C cacao powder

½ coconut oil / olive oil

2/3 C honey or pure maple syrup


PEANUT BUTTER CARAMEL CENTRE

1.5 C natural peanut butter

1 C pitted dates soaked overnight in water

2/3 C honey or pure maple syrup

4T coconut cream Note: don’t shake the tin – use the thick cream from the top

1tsp sea salt


CHOC GANASH TOPPING

Block of dark chocolate or homemade raw chocolate (see alternative recipe at bottom)

¼ C natural peanut butter

1-2T coconut cream

1tsp sea salt

* Salted crushed peanuts for topping


METHOD

The best part about this recipe is that although it has so many nutritious amazing ingredients- it’s really simple!! It’s a whizz layer freeze style of baking.

It is 100% vital to have a food processor (blenders have been known to break in our house in the attempt of blending dates and peanut butter)

and you will need to soak the dates overnight AND it takes atleast 4 hours or overnight for the final product to set!!!! These times cannot be compromised or substituted. I say this now because there is nothing worse than getting to the end of a recipe and planning to plate up in 5 mins and then reading “set in fridge overnight’ Trust me – been there done that and it is totally worth the wait!


1. Blend the oats in the food processor (FP). Drain the soaked dates and blend with oats until combined – about 30 seconds. Add the oil, honey and cocoa. This should form a thick doughy base. Depending on your FP you might need to add more oats if it’s too soft. You want to have to ‘press’ the base into the tin not pour it.

2. Press into a large brownie tin lined with baking paper and refridgerate. If it looks like you have quite a lot (even once the taste testing is perfected) then press some into small patty pans to make little cupcake size peanut butter treats. I use these cute heart shape mini tart tins which make for a super special sweet treat!

3. Now the caramel centre – get those finger licking skills ready. Place the drained dates into the food processor and blitz until a smooth caramel consistency. Add peanut butter, coconut cream, salt and honey and blend for 1 minute until creamy and lump free. Pour over the chocolate brownie base and refrigerate. Now get those fingers into the food processor and lick the thing clean – once the blades are removed of course! This high protein, good fat and fibre rich layer is to die for…  and it means less elbow grease in the kitchen sink cleaning!

4. Melt the dark chocolate in a bowl either over the stove or slowly in a microwave. Once smooth (and not burnt) add the peanut butter, coconut cream and sea salt and stir until it is well combined. Pour over chilled peanutbutter caramel layer and top with crushed peanuts. Place in freezer for 3-4 hours minimum or overnight for best results.

5. When ready to serve simply take out of tin and let it thaw on the bench for 10-15 minutes. Cut into slices and enjoy! You can freeze ready to grab slices for up to 8 weeks. Little tip when slicing – if the chocolate ganash is really hard and proving difficult to chop, cut long ways and then turn the slice on its side and cut the fingers/pieces that way. It is easier to cut on a small ‘edge’ side rather than flat chocolate. Little bit of architecture model making knowledge there :)

Goodluck, have fun, taste/sample regularly and let me know how it goes! Put your photo up on instagram and tag me @katie_kale_kettlebell or hashtag #kaleandthekettlebell nom nom nom

K


*ALTERNATIVE RECIPE OPTIONS


RAW CHOCOLATE

1/3 C coconut oil

1/3 C cacao powder

2-3Tbs honey or maple syrup

Melt coconut oil and combine with honey and cacao powder until smooth. Add in place of the melted dark chocolate for the ganash topping.


PALEO: To make this recipe paleo you can simple replace the 1 1/4 C rolled oats with nuts of choice. Almonds or a mix of ABC – Almond Brazil and Cashew would work perfectly.

VEGAN: To ensure the recipe is totally vegan use Maple syrup in place of the honey

80/20 LIFESTYLE

I am sure you have heard of the 80/20 lifestyle consisting of 80% clean and healthy food + 20% indulgent treat food = 100% perfect balance. This is the ‘lifestyle’ (not diet… I hate that word) that I like to follow and live by. It means that I eat healthy and clean foods majority of the time but then let myself indulge in the most naughty of naughty treats without any guilt or regret. When I focus on treating myself 20% of the time it means that I am naturally eating healthy the other 80% without trying. Continue reading “80/20 LIFESTYLE”

CRUNCHY NUT BAKED CHEESECAKE WITH LEMON CURD AND MERINGUE

Okay so I’ve been meaning to get this one up for aggggggges now but have never found the time. BUT whilst sitting on the plane to Spain I have nothing but time so here goes!

It all started back in July in my birthday week. I couldn’t decide what cake I wanted to celebrate my 25th bday with…. Cheesecake or lemon meringue pie? Both of which are my all time favourite desserts! The lemon meringue pie I made for Mother’s Day recipe HERE was an absolute hoot. Oh and the choc base lemon curd tart too recipe HERE, but then cheesecake is my fave. And then boom it hit me. Why limit yourself to one when you can layer them and have BOTH! So I used the ever faithful Sarah Wilson I quit sugar recipes as a base and combined this killer dessert! Fair to say I had a super sweet birthday minus the sugar!! image

CRUNCHY NUT BAKED CHEESECAKE WITH LEMON CURD AND MERINGUE

Serves 8 – GF DF* P SF – 3 hours

BASE
1 cup oats or LSA mix
1 cup almonds or pistachios/hazelnuts (use another but other than almonds here if you used LSA above)
120gms coconut oil or butter
1 cup desiccated coconut

2 Tbs rice malt syrup

pinch of salt

dash of cinnamon

CHEESECAKE FILLING
2 Tbs Greek yoghurt

4 Tbs Full fat coconut cream

1 cup cream cheese

1 cup ricotta cheese
1 egg
1 Lemon juiced and zest
1/2 cup rice malt syrup
1 vanilla bean

LEMON CURD
1/2 cup coconut oil
2 whole eggs
6 egg yolks (save the whites)
Juice and zest of 2 lemons
3 Tbs rice malt syrup
1 tsp stevia

MERINGUE
6 egg whites
2 Tbs rice malt syrup

METHOD:

Preheat oven to 160 degrees Celsius.
Line or spray a deep pie / tart tin.

Place the ingredients for the crust in a food processor and process until combined. The more you blend the more the oils from the nuts are released. Add more butter or coconut oil if necessary. Take out and press into a lined cake or tart dish working your way up the sides. Remember it is not just a base but a crust for the filling so make it deep!
Place crust in the oven for 8-10 minutes until lightly browned. Set aside to cool.

Meanwhile combine the cheesecake ingredients in a clean food processor. Careful not too over process. You just want the lumps gone and watch out for any lemon pips whilst squeezing!
Pour the cheesecake filling into the cooled tart crust. Place in oven for 20-30 minutes until it bakes and goes hard or set like jelly. Don’t over cook!

For the lemon curd, melt the coconut oil on the stove. Add the rice malt and lemon juice/zest. Slowly add the eggs and yolks whilst whisking. Careful not to over boil the curd otherwise you will end up with lemon scrambled eggs! When it begins to thicken lift it off the heat and whisk in mid air. Add back to the heat if necessary. Leave to cool. Pour over the cheesecake layer and set aside.

For the final layer of this epic cake / pie / tart you need to make the meringue. Either with some good old elbow grease or electric beaters beat the egg whites and rice malt until it starts to go white and glossy. You want it to hold its form and make peaks. About 3-5 minutes. Slop the meringue mixture onto the lemon curd layer. When it is covered use the whisk or a spoon to create some peaks for aesthetic purposes.
Place the whole cake into the oven for 6-8 minutes until the meringue has browned at the tips. Careful not to burn or grill it! Just a light browning it will do.

Take out and place in fridge to set for 2 hours or overnight! When it’s time to eat it take it out and sprinkle with some matcha green tea powder if you have it!

image

Serve huge slabs of this beauty and enjoy! I couldn’t believe how amazingly yum and sweet this cake was. The perfect amount of savoury creamy lemony ricotta and tangy sweet curd, crunchy base and fluffy top ahhhhhhh just make it! You can even freeze any left over slices (left over… Is there such a thing?)

K

imageimage

NEW MONTH NEW GOALS NEW CHANGE

Who loves a clean slate? (Insert little girl emoji with her hand in the air!!) I am all about the Monday fresh start each week especially after indulgent and eventful weekends. Then there are the new months and even the new seasons. It is starting to feel like a lot of things in my life are new at the moment. New country, new house, new non job, new local coffee spot… new life really. Continue reading “NEW MONTH NEW GOALS NEW CHANGE”

ACAI BOWL

Don’t pay $18 at a cafe when you can make it at home so easily. You don’t need to buy frozen acai either, I love using Acai powder from Tropeka. Shop at your local Health food store and they will have many brands. So here is my classic Acai bowl recipe. Simple and looks oso vibrant and healthy. Go NUTS with the toppings (pardon the pun) It is super delicious and who doesn’t love spooning their food! Continue reading “ACAI BOWL”

WHEN, WHAT AND HOW TO EAT

When it comes to dieting and eating right there are SOOO many different fads and diet rules that you SHOULD follow? But should you? The short answer is NO. The long answer… well grab a cuppa and keep reading! The motto of this post is … Whatever will make you most likely to consistently eat the way you are supposed to eat, THAT’S how you should eat. Whatever is most convenient, enjoyable and sustainable for YOU is the exact way YOU should organise your diet. Continue reading “WHEN, WHAT AND HOW TO EAT”

13 FOODS YOU SHOULD BE EATING EVERY DAY

With so many fad diets circling social media and the health and fitness industry it is hard to know what to eat. It certainly doesn’t help that the ‘gluten free’ diet is becoming a bit of a fashionable trend and people are focussing more on what NOT to eat, than what TO eat! Don’t eat dairy. Don’t eat meat. Don’t eat fats…. ringing a bell?

Continue reading “13 FOODS YOU SHOULD BE EATING EVERY DAY”